I have loved stamping for a very long time. One of my favorite things to do was use some colored pencils and a dove blender pen to create lovely little scenes. As I used to say, stamping is coloring for grown ups! Until I had one student say to me she hated coloring. That is so sad. I have always found coloring to be very relaxing 🙂
At any rate, I like to color in my stamped images. I like color!
I have been hearing about copic markers for a few years now. Two? Three? A while anyway. And I wasn’t too interested. I have plenty of markers. And I love my Dove blender pen. Absolutely adore it. I didn’t need to spend more money on yet another set of markers, when what I have works.
Except I like to try out new trends and techniques. After all, I teach this stuff. I should at least have a passing familiarity with it, right? At least that’s what I told myself when I found myself at Hobby Lobby today looking for copic markers. I wasn’t planning on buying anything except some kind of craft project for the kids. But I noticed a how-to video on the clearance rack on working with copics. Hobby Lobby carries copics? Let me check them out!
So that’s how I found myself with a handful of copics in the check out lane today.
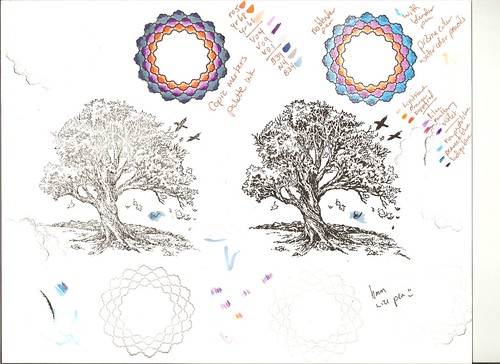
After I got home I puttered around, then decided I really should see if these markers are all that they’re cracked up to be. First I had to decide what image to stamp and color in. My favorite tree? Sure. The versamark chalk ink pad was a little dry. Tried my Distress ink pad. Much wetter! How do they stand up to a dove blender pen? They both bleed. Back to the drawing board. I couldn’t find my archival ink pad, but I did find my Palette. That did the trick. But when I tried to stamp them on the opposite side of the page, the linen texture kept me from getting a good impression. Okay then. Time for a different stamp. What to use, what to use? Oh yes! New stamp from Studio Calico. Love these circles!
A note about stamps and getting a good impression. You need a fairly smooth cardstock. I’m using the back side of a linen paper from marco’s papers that I absolutely adore. Rubber stamps give you a crisper image for the most part, but if you use a foam pad under your paper and do NOT press too hard you’ll get a nice image with polymer. If you look closely at the left hand image, you’ll see a little ghosting of the ink, from me pressing too hard.
Okay then, time to color!
I started with the copics, and used a pouncing motion to color in the image, light to dark for each group of colors. Then I went dark to light to blend them together. Two interesting things I noticed about copics. One, they spread a little as you lay them down, but not very much, so they’d probably be great if you wanted to get really detailed coloring. And two, as you lay them down over each other, they sort of pick up the other color, without muddying up your marker tip. That was nice. Oh and here’s a third thing. I went over them a number of times, and they didn’t raise the nap of the paper or tear it like markers can do if you get the paper too wet. Although they did threaten to bleed through.
The second circle I colored with watercolor pencils. The left side I used a dry blending technique, which let the texture of the paper come through. You can cover up the texture by using a heavier hand, but I was just being lazy and didn’t want to get my pencil sharpener out. The right side I colored by laying down three stripes of color, and then used my blender pen to blur them together.
Which technique do you prefer? I think I like them all 🙂
Oh, and you can blame this lady for me buying the copic markers. It’s all her fault! 😉