Category Archives: rubber stamping

Tips for Stamping Success and Chocolate Pudding Pie!

I’ve said it before, and I’ll say it again: I’ve made just about every mistake there is to make while stamping. Blurred images? Incomplete ones? Ones that just look awful, even though I know there was enough ink on the stamp? Done it. And I have been doing this long enough that I know why I did not get the image I wanted. It can be frustrating to be unable to produce a beautiful image. Here are some simple things you can do to increase your odds. You may think these are all obvious, but anytime you don’t get a good image, it’s probably because of one of these things.

1. Make sure your desk is smooth and clean. You don’t want glitter, or uneven layers of paper under the image you’re stamping. You will get voids and lines in your image if you stamp on an uneven surface.
2. Make sure you’re stamping on smooth cardstock. Even a little bit of texture can affect how well the image transfers to the paper.
3. Use ink that is appropriate for the surface you are stamping on, and the material your stamp is made of. I love Tim Holtz distress inks, but they have a tendency to bead up on photopolymer stamps. That will get you a splotchy looking image. Dye inks can bleed into very porous papers. Pigment inks take a long time to dry, especially on non-porous papers, so can smudge after the fact.
4. Press straight down, and then pull straight up. Don’t rock your stamp. Rocking will give you some ghosting around your image.
5. Don’t press too hard on photopolymer/acrylic stamps. They have a lot of give to them, so when you press hard, you get the sides of the image and not just the surface.
6. If you aren’t getting good ink transfer, put a foam stamping mat under the paper. That way you will be able to press harder without mashing the stamp. If it’s a big stamp, stand up and press all over the image, not just in one place.
7. Lastly, make sure your stamp is clean. Not every last bit of ink is gone clean, but no glitter/glue residue clean.

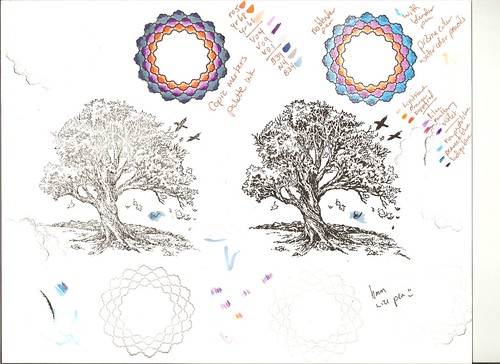
If you make sure you’ve got these basics covered before you start, you should have a wonderful image every time you stamp. Unless you’re like me. (Please note the remnant of glitter on the “n”, and the “e” I had to restamp when I did not press straight down the first time.)
choco pudding pie

Copic Markers vs Watercolor Pencils

I have loved stamping for a very long time. One of my favorite things to do was use some colored pencils and a dove blender pen to create lovely little scenes. As I used to say, stamping is coloring for grown ups! Until I had one student say to me she hated coloring. That is so sad. I have always found coloring to be very relaxing 🙂

At any rate, I like to color in my stamped images. I like color!
I have been hearing about copic markers for a few years now. Two? Three? A while anyway. And I wasn’t too interested. I have plenty of markers. And I love my Dove blender pen. Absolutely adore it. I didn’t need to spend more money on yet another set of markers, when what I have works.

Except I like to try out new trends and techniques. After all, I teach this stuff. I should at least have a passing familiarity with it, right? At least that’s what I told myself when I found myself at Hobby Lobby today looking for copic markers. I wasn’t planning on buying anything except some kind of craft project for the kids. But I noticed a how-to video on the clearance rack on working with copics. Hobby Lobby carries copics? Let me check them out!

So that’s how I found myself with a handful of copics in the check out lane today.

After I got home I puttered around, then decided I really should see if these markers are all that they’re cracked up to be. First I had to decide what image to stamp and color in. My favorite tree? Sure. The versamark chalk ink pad was a little dry. Tried my Distress ink pad. Much wetter! How do they stand up to a dove blender pen? They both bleed. Back to the drawing board. I couldn’t find my archival ink pad, but I did find my Palette. That did the trick. But when I tried to stamp them on the opposite side of the page, the linen texture kept me from getting a good impression. Okay then. Time for a different stamp. What to use, what to use? Oh yes! New stamp from Studio Calico. Love these circles!

A note about stamps and getting a good impression. You need a fairly smooth cardstock. I’m using the back side of a linen paper from marco’s papers that I absolutely adore. Rubber stamps give you a crisper image for the most part, but if you use a foam pad under your paper and do NOT press too hard you’ll get a nice image with polymer. If you look closely at the left hand image, you’ll see a little ghosting of the ink, from me pressing too hard.

Okay then, time to color!
I started with the copics, and used a pouncing motion to color in the image, light to dark for each group of colors. Then I went dark to light to blend them together. Two interesting things I noticed about copics. One, they spread a little as you lay them down, but not very much, so they’d probably be great if you wanted to get really detailed coloring. And two, as you lay them down over each other, they sort of pick up the other color, without muddying up your marker tip. That was nice. Oh and here’s a third thing. I went over them a number of times, and they didn’t raise the nap of the paper or tear it like markers can do if you get the paper too wet. Although they did threaten to bleed through.

The second circle I colored with watercolor pencils. The left side I used a dry blending technique, which let the texture of the paper come through. You can cover up the texture by using a heavier hand, but I was just being lazy and didn’t want to get my pencil sharpener out. The right side I colored by laying down three stripes of color, and then used my blender pen to blur them together.

Which technique do you prefer? I think I like them all 🙂

Oh, and you can blame this lady for me buying the copic markers. It’s all her fault! 😉

Fall Class Samples

I’ve been working on putting together samples for the classes I’ll be offering this fall at the local JoAnn’s etc. I’m trying to put out some interesting things using stamps, and for kids as well. I haven’t had much interest this summer, but hopefully this fall will pick up.

For kids I’m going over basic scrapbooking with a single page that they can use as a gift, or use to start telling their story through scrapbooking. I’ve also put together a simple gift set for beginning rubber stampers, that will include a card, a stamped mat for a picture, and wrapping paper using a recycled paper bag, or craft paper.

The purpose of the basic adult rubber stamping class is to make as many different cards using the same basic stamp sets. The intermediate class will focus on embossing and inking techniques to make personalized patterned paper for use in scrapbooking and card making.

On to the details: This is the kids’ rubber stamped gift set. They’ll be practicing basic stamping and masking to make the paper, a card, and to decorate the mat. My photo is horribly dark, but the actual pieces are bright and happy.

The kids basic scrapbooking class will focus on choosing papers, coming up with a layout, and adding journaling. I had my son pick out the photo, and the embellishments, but did the design myself. (He’s only five, and would rather be playing Age of Empires than helping me put together samples for work.)

The basic rubber stamping class will focus on making as many cards as possible. I will be going over basic techniques and try to help any students create their own cards. I’ve made a few samples as a jumping off point, and we’ll go from there.

The class I’m most excited about is my stamping in scrapbooks class. I’ve used stamps and various ink techniques to make my own paper designs. I love, love, how they came out. They’ve got depth and interest, and these techniques can be used for all sorts of things. I hope I get people for this class most of all.

So let me know what you think. If there are any items you want to make yourself, let me know, and I’ll type up instructions. Hope you like these!

Basic Supplies: Paper, Stamps, and Ink

Okay, for all you first time stampers, here’s a little about the three basics. Anything else is extra. (Well, stamping without embossing would be sad, but that will get its own post.)

First of all you need paper. You can buy prefolded cards at craft stores and office supply shops, or you can buy cardstock in full sheets and cut and fold to the size you decide you want. And if you’re making a card, you do want cardstock, not typing/printer paper. Pick up a piece and feel it–if it’s a little thicker and doesn’t flop when you hold one piece by a corner, it’s suitable for cards. If it flops you can use it to make envelopes or print out recipes from epicurious. If it’s so stiff you could knock someone out with it, you’re in the wrong store. I said office supply or craft store, not home improvement!

The texture and coating on the paper is also important. There are many, many beautiful textured papers available, but they don’t take an image very well. Although you may want that effect after becoming proficient at stamping, you don’t want to add that to the mix when you’re just learning how to stamp. What you want is a smooth surface, either coated or uncoated. Coated papers come in matte and glossy finishes, much like photography paper, but not all inks will dry on them. Uncoated papers are much easier to find, and work with any ink. Finally, if you’re going to be saving your stamp-art for posterity, use acid and lignin free paper. It lasts longer without breaking down.

Second of all you need stamps. There are many types of stamps you can use. There’s the standard pink rubber stamps you see whenever you poke around the craft store. Those are usually mounted on wooden handles/blocks with an index picture to show you how the stamp will look when it’s used, and sometimes with the manufacturer’s recommended treatment. (ie. how to color it) You can also get these as unmounted pieces of rubber sometimes, depending on the manufacturer and the retailer. Then you need to have a wooden or acrylic block to attach to the stamp. (It can be permanent or temporary.) I’ll post some links on the side bar for you to explore if you just want to order some.

A fairly recent type of stamp is clear acrylic stamps. They usually come in sets, and stick to acrylic blocks all by themselves. They’re great when you need to position a stamp carefully, and don’t want to use a stamp positioner. (Think alphabet stamps.)

You can also get foam stamps in craft stores. These are generally bold images with little detail. They work best with paint rather than ink, and are fun for home decor and kid projects.

You can make your own stamps as well. People have used everything from linoleum tiles they carved themselves, to bubble wrap, which gives a nice texture to backgrounds.

Last of all you need ink. There are three main types of inks: pigment, dye, and permanent. Permanent inks are generally solvent based, and are great for stamping on non-porous surfaces like glass and coated papers. Dye inks are usually water based, so are easier to clean up, and you can create wonderful water color effects with them. Pigment inks are the slowest drying, so are the best for using with embossing powders.

Hope that gives you a few basics, and a little more courage to go explore the paper crafting aisle. As always, I’d be glad to go into way too much detail, if you have any questions.

No excuses!

Whenever I hear someone say “You make such beautiful things! I could never do that,” I have to control my impulse to simultaneously explain how it was done, pontificate on my belief that anyone can be a stamper/scrapper, and roll my eyes on hearing that again.
Stamping is not rocket science, and scrapbooking is important. And yes, you can do what I do, you just have to want to do it.

Stamping is easy. There are a few basics you need to know, and the rest is experimentation–play time if you will. I will go into the details of various supplies and techniques as time goes by. For now, I’ll just try to give you some ideas of the variety of things you can accomplish with rubber stamps.

You can stamp on just about anything, with just about anything. As a fellow stamper once said, “I’ll stamp anything, as long as it holds still long enough.”

To begin, there are the standbys– the holidays and birthdays and special occasions you try to remember with a card. These require the standard card stock, rubber stamps and inks. These can be simple, or you can use these to experiment with new techniques, or to try out new supplies.

Then there are the home decor projects–usually done with acrylic paints, or various permanent inks designed for everything from fabric to glass. Make sure if you try one of these projects you allow yourself to experiment. The first time you do something is rarely picture perfect.
Curved surfaces can be tricky to work with, and paints are slipperier than inks, so are easier to smear when lifting the stamp. I used foam stamps on the pots, and a nice sea sponge to make the clouds in my son’s room.
I’m rather pleased with how each of these projects came out, and the pots are holding up surprisingly well, considering that they were painted over seven years ago, were not sealed, and have been exposed to the elements pretty continuously.

You can also use stamping for wrapping and gift boxes. These are papiermache gift boxes that were painted and then stamped and embellished, as well as a handmade take out box. They make great little presents in and of themselves.

Lastly, try making your own party and holiday decorations. Here, I’ve used stamps to embellish plain Christmas ball ornaments, and to decorate a simple glass. Once again, take your time when doing things like this–curved surfaces require more care than a simple, flat piece of paper.

So, go for it. Try to bring a little art into your life. You don’t have to be an artist to make things that you find beautiful, you just have to be willing to get your hands dirty.

I find few things as satisfying as ink-stained hands and completed cards, projects, and pages.

In the beginning….

There was paper, and it was good.
Then ink was discovered, and words and images flowed from the pen, and it was good.
Then came rubber stamps,
embossing powder ,
water color pencils and crayons,
mica powders,
chalk inks,
stencils,
paint….
Oh you get the idea.

I like paper crafting. I’m learning more each day, and having fun while I’m at it.
Rubber stamping is coloring for grown-ups. It’s zen meditation for those who don’t like standing on their head. It’s art for those who appreciate beauty, but couldn’t draw a house to pay their rent.

So here’s the beginning of my public journey through papercrafting and life in general. Be gentle with me, I’m not good at speaking in public.